Parts and equipment for motorcycles, quads, scooters and bicycles


Everything you need to know about the multimeter
Le multimeter is a set of electrical measuring devices. This device, also known as a universal tester or electrical tester, is used to take measurements of voltage, current and resistance of electric current . These different values are noted and determined par the tester, respectively in volts, amps and ohms. It makes it possible to detect a breakdown or possible malfunction in an electrical circuit.
![]()

What is a multimeter used for?
Fast and precise, the multimeter combines the functionalities of voltmeter, theammeter and ohmmeter. It allows you to measure current voltage, resistance and intensity. Thanks to its voltmeter function, the multimeter allows you to check the voltage of a circuit or an electrical outlet. This option helps to take voltage measurements, and thus avoids any possible risk of electrocution. Used in the form of an ohmmeter, the multimeter is used to determine the resistance of a component and to detect potential current leaks.
Placed on the market in 2009, the digital multimeter or digital multimeter, is a model which is also available as a shockproof digital multimeter. This type of multimeter is very efficient and exceeds the analog multimeter in terms of precision, speed and accuracy.
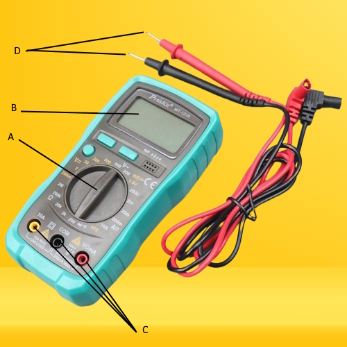
The device is equipped with a digital dial for displaying points, tension and intensity measurements. It has a multi-dot display, selection buttons for various actions and input terminals.
Digital multimeters generally include four components:
• The display area: where the measurements are displayed.
• Buttons: to select different functions. Options vary from model to model.
• The rotary knob: to select the main measurement values (voltage, current, resistance).
• Input terminals: where the test leads are inserted.
Each of the components corresponds as follows:
• Selection button (A): The button has an arrow at its end to choose the parameter to measure (such as voltage, current and resistance).
• Display panel (B): The screen is a liquid crystal display (LCD), which can display up to four digits under normal conditions, and which can also display a sign negative.
• Ports (C): The front panel of a multimeter has three main ports:
- COM symbolizes COMMON and is generally used to connect the ground or negative part of the circuit.
- VΩmA allows you to measure voltage, current (up to 200mA) and resistance.
- 10A is the special port used to measure large currents (typically greater than 200mA).
• Probes (D): Typically, a multimeter comes with two insulated probes (one red probe and one black probe) to make an electrical connection between the device under test and the multimeter. The plug of the red probe is connected to the VΩmA port and that of the black probe is connected to the COM port, while their wires are connected to the positive and negative terminals of the device under test (DUT). Apart from the color, there is no difference between the red and black probes.
![]()
How to connect a multimeter?
Practical, this electrical measuring device is very easy to use. You will need to correctly connect the two probes delivered with the device. The black cable will go into the common location (called COM), and the connection of the second, the red wire, will depend on the size you wish to use. Depending on the model, it should also be noted that when measuring amps, two locations may be offered: mA (milliamps) or A (amps).
Next, select the unit to analyze: V (volts = voltage), A (amps = intensity) or Ω (ohms = resistance). Depending on the quantities to be observed, the selection of the type of current will be necessary, the continuous being represented par this symbol =, and alternating par ~. Calibration of the device is necessary in order to benefit from precise results.
How to measure voltage with a multimeter?
1. Turn the knob and select a value below which the designated voltage value can lie.
2. Connect the red probe lead to the positive terminal and the black probe lead to the negative (or ground) terminal.
3. Ensure the correct range to be measured is selected. As a general rule, it is appropriate to start par the highest range, then move to the immediately lower range if necessary.
4. The screen displays the terminal voltage.
How to measure current with a multimeter?
1. Turn the knob and select one of the current ranges displayed on the panel.
2. Connect the red probe to the 10A socket if the measured current is greater than 200mA.
3. Ensure the correct range to be measured is selected. As a general rule, it is appropriate to start par the highest range, then move to the immediately lower range if necessary.
4. The screen displays the current at the terminals.
How to measure resistance with a multimeter?
1. To check the value of a resistor, connect the resistor between the red and black probes, turn the knob so that it points to one of the resistance values on the front panel (start par the highest value).
2. The value selected on the panel must always be greater than the value of the measured resistance, it is therefore necessary to proceed par trial and error to choose the button needle. Regardless, the resistance value is obtained much faster and more accurately than par the conventional manual "BBROY" method (use of the color code of the resistors to determine their resistance value).
3. The screen displays the resistance value measured between the wires.
How to test continuity with a multimeter?
The probes of a multimeter can be used to check whether there is a viable connection between two points in a circuit. This function is particularly useful for debugging a circuit and checking for connection errors. A fuse can be checked by connecting it to the probes in continuity mode, and if a beep is emitted, the fuse is good.
1.Turn the knob and select the symbol corresponding to a sound wave propagating on the panel, under which the device enters the continuity check mode. In this mode, when the two probes touch, a beep indicates that the connection is closed.
2.Touch one probe to point A and the second probe to point B. If a beep sounds, it means both probes are connected.
3. The display panel indicates the resistance at the tested points.
![]()
What are the uses of the multimeter?
The multimeter is the most commonly used tool for troubleshooting electrical problems. Here are some example use cases:
• To test a Battery, simply connect the multimeter leads and measure the DC voltage across the battery terminals. This is a quick and effective way to determine if the battery is dead, good, or somewhere in between.
• When assembling the different parts of a harness, of a product, it is common to work with a bundle of wires of the same color. In this case, a multimeter can be used to test the resistance of each of them, allowing them to be distinguished from each other.
• If in doubt about which pin is "live" when checking an AC outlet, a multimeter can be used to determine the voltage coming out of the point and thus verify s it is under tension.
![]()
Precautions
• It is advisable to anticipate the signal to be measured and adjust the range of the device accordingly to avoid overloading and damaging the multimeter.
• To prolong the battery life of an electrical multimeter, turn it off when not in use.
• When using the red and black probes of the multimeter, always be sure to hold the gripped part and not exceed this area to avoid electrical shock when measuring high voltages .
• After use, try to encapsulate the multimeter and probes in their respective cases to avoid mechanical or electrical damage.
• If the multimeter is stored for long periods of time without use, be sure to remove the batteries to avoid corrosion.


HERE 100% OF THE PARTS INDICATED IN STOCK REALLY ARE!


 Cart
Cart
This product has been added to your cart
 Cart
Cart
You have already added this product to the cart or there is not enough in stock.